So I decided to grab Unreal Engine 4 a few days after it was announced, and boy is it awesome. I’ve taken a ‘content first’ approach, focusing almost completely on the material system and getting models of various types into the engine. In the last two weeks, I’ve gone from mere exploration to serious consideration into dropping source altogether and refocusing my asset creation pipeline to unreal. Now I’ve done this with branches of source in the past, I now primarily target SFM and secondly target to SDK2013 usually getting full functionality in both. Now that I’ve gotten my feet wet with Unreal, I think I can implement UE4 and still build for both with a few extra layer comps in photoshop and just a few additions to the pipeline in max. I’ll spend this post talking about those modifications to my workflow and my initial critique of UE4, from a Source Engine veteran’s perspective.
So I want to start by saying I’ve focused almost completely on static meshes, which are the cornerstone of my work – I do plan on moving to skeletal meshes and animations, as well as scripting and mapping in the near future, but I wanted to start where I felt most comfortable and work my way out.
Materials
The thing I think I’m most excited about, and what I started playing with on day one, was UE4’s material system. Coming from the land of .vmt and vertexlitgeneric, the idea that I can make incredibly powerful changes to the basic mechanics of the shaders is like giving me the keys to the kingdom. I was able to recreate a rough estimate of what a 20 line vertexlitgeneric vmt does in about 40 seconds by dragging wires to the right nodes.
The physically based shader system is neat, but I think it’s a bit buzzwordy – it took me about a day to modify my existing exponent and spec texture maps to get essentially the same effects I was getting in source. I’ll break those changes down in the next section, but I just want convey the fundamental change to the thought process for deciding a material property set in source to that of UE4.
A material for a model in source consists of:
-Diffuse/Normal/Detail texture/self illumination
-Specular intensity expressed as the strength of the cubemap controlled by the alpha of the normal or basetexture, plus global tinting
-The strength of phong and it’s glossyness levels expressed by the $phongboost, normal alpha, and phongexponentmap’s red channel
-The phong’s frensel values, controlling the light bounceback depending on the direction of the surface in relation to the eye
-The albdeto tinting of phong as expressed as the green channel of the phongexponentmap
-The rimlighting intensity, exponent, and mask, as expressed in rimlight commands and alpha of the exponentmap
-halflambertian shading, for sharp and dramatic shading, deep blacks on the shadows, or a softer more even lighting model
-(Additional parameters like alpha and complex lightwarps, selfillum, phongwarps, subsfurace textures, material proxies, etc)

With those in mind, you can effectively recreate most any material. Generating something of value takes a bit of guess and check, experience, and a good ‘feel’ for what numbers work well. I just know from experience that a good looking metal requires a mix of specular and phong with a sharpness of about 40 or 50, and if it’s colored, a 150-170 albdeto tint, plus a hint of rimlighting. Dry wood might use no specular, no rimlighting, and a subtle phong that has an exponent value of about 2-5 and no abldeto tinting. It’s not explicit, but if you are serious about making a good material, you already think in terms for what it is physically made of, and the values you enter into a vmt are borne out of those translations based off of your knowledge of vertexlitgeneric and workarounds needed to avoid undocumented command conflicts to get something working.
UE4 takes that ideal workflow you should already have, and makes it the explicit way of doing it. A simple texture based material in UE4 is essentially:
-Diffuse/Normal/self illumination/Ambient Occlusion
-Metallic
-Roughness
-(Advanced effects like subsurface shading, refraction, position offset, etc etc)

Now if you want to define a material, you really need to ask yourself: Is it metal? If yes, then white. If no, then black. How rough is it? If perfectly smooth, then black, if infinitely rough, then white. The shader takes care of the particulars like tinting, frensel values, rimlighting, and refelctive intensity. As long as you don’t mind taking a leap of faith and buying into their system and what they think looks like metal and what looks like ‘not metal’ you’ll be happy as a clam. The system seems simple but is very robust. Their content examples show an incredible range of very believable materials achieved just by modulating these two simple values, and I applaud Epic for the work they’ve done. You loose a bit of control, but on the flip side, you get incredible results by answering two simple questions and relatively little experience with the engine. On top of that, the expandability of the system is near infinite – with the right combination of nodes, pseudo photoshop blending functions, complex math hidden in simple boxes, and the ability to change almost everything on the fly, I feel I really can express almost anything in the system. I’m excited to learn it in order to create new and exciting materials.
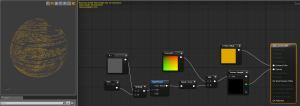

The instancing system is also very exciting to me, I made up my first useful parent instance yesterday essentially replicating the simple functions of vertexlitgeneric for fast material prototyping:

Textures
My texture pipeline to UE4 is still developing, and as my knowledge of the engine develops so will my technique. However, I’ve already made some fundamental changes based off my newfound freedom and control of the material system. Since I had a finely tuned machine for making source ready textures, it’s very similar to source’s workflow, for now.
I’m currently exporting .tga’s for:
–Diffuse (no ambient occlusion) + ‘paint’ mask for alpha. I’m still working on a solid implementation of dynamic coloring, but I’m reserving the diffuse alpha for a single channel paint layer.
–Normals (no alpha). I’m scrapping the normalmap using any special channels and reserving it for potential channel flipping – there’s nothing that says I can’t rewire the normals to grab the red channel from the alpha, which is common in games due to DXT compression. In the short term, however, there’s no compelling reason to make this time consuming change and increase the size of the actual compressed texture by adding a map for minimal improvement in texture quality. My position on this may change, and that’s why I’m leaving the normal’s alpha alone for now.
–Mr. AOI (Mister Eyy-Oh-Eye). This one is my custom blend, essentially replacing source’s exponent map in my workflow. It is Metal(R), Roughness(G), Ambient Occlusion(B), and Self Illumination(A). The order is based off of the input paths in the shader editor, essentially going top to bottom, and I find that the abbreviation is easy enough for me to remember what goes where without thinking too much about it.
–Detail textures and other experiments. I’m slowly implementing detail textures on the micro and macro scale, and having detail normals is new for me, but it’s something I’m going to try working into my workflow.

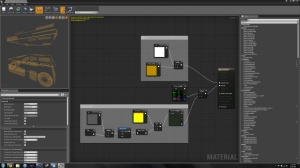
–Revamped holographic textures. In source, transparency is always expressed as an alpha map, and I generally split textures into a foreground, background, and animated midground. This meant three vtf files for three vmts, with a lot of wasted RGB, especially since the color on the simple ones was done by the shader. Now I can combine all three depth textures into monochrome channels, and I’m now using the alpha as a detail texture – in this case, animated scanlines. This is a nontrivial savings – I can now store the same data in about 30% of the texture space with no additional compression or data loss! That’s huge, we’re talking about ‘3 for the price of one’ here. What’s more, after doing an initial implementation of the new technique, I was reaffirmed by the sample content: The guys at epic do essentially the same thing. They also have some real neat rimlight intensity and whatnot going on that I’m probably going to snag for my own devices.
Prop Models
I’ve focused on, and at this time can really only write about, static meshes. I was thinking of holding off with writing about models until I’ve gotten my feet wet with animations and skeletal meshes, but I believe that would go beyond the ‘first impressions’ idea of this post. That said, importing models is pretty straightforward, with a few notable exceptions.
Epic has made a solid statement that they want you to use Autodesk products, as the only way to get something into the game is via the FBX content wrapper. For someone like myself that uses 3dsmax, it’s a beautiful thing. FBX is closely tied to max/maya, and for the most part, the importer works quite well. I really do love being able to export multiple separate meshes at one time, each with physics and materials ready to go. One thing I did have to adjust is the scale on export, though. Naively, max uses inches, which is good for me because A) I’m an American that was born and raised on the system (and having an engineering degree I also use metric, before you burn me at the stake for being backwater hillbilly) and B) Source uses inches. Seriously, one hammer unit = 1 max unit = 1 inch. Doesn’t get much simpler then that. Well, UE4 uses centimeters as its base unit, which makes sense from a globalization and computer science standpoint; it’s just a bit of ‘fish out of water’ for me until I adjust. Also all the models I’ve made for source mapping, using inches and units in powers of 2, are essentially useless, since they don’t align to the grid. Like at all, ever. This has given me the opportunity to rethink and redesign some of my core sci-fi assets, and I’ve already taken the opportunity to remake some of my first models with my improved skillset.

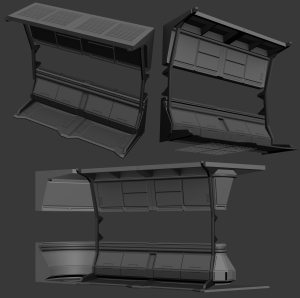
Collision meshes are a bit more picky then source’s system. In source, as long as you assign each collision sub object its own smoothing group and made sure it’s not concave, you were pretty much good to go, once you’ve given it a dummy material. For unreal, since it’s all automated from FBX, you need a case sensitive prefix, and specific postfix, and the name in between MUST be exactly the same as the object it represents. Furthermore, submeshes for a single object CANNOT touch. I haven’t confirmed if it was a compound problem with naming, but I also believe the at least need a dummy material applied to them as well. All that said, it’s just a few steps more care then source, and the meshes can be used for both. I’ve gotten pretty handy with simple box modeling since I started making my own meshes for source models, and my skills are easily reapplied in this pipeline.
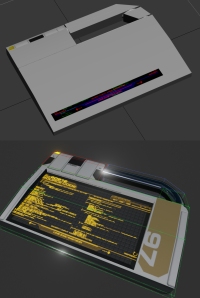
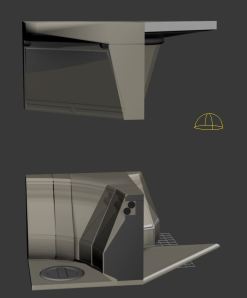
One thing I ABSOLUTELY DETEST, however, is the need of a second UVmap for lightmaps. From my troubleshooting and searching, I found that this is a carryover from UDK, and it is a pain to handle. Sure you can get a ‘working’ second unwrap from UE4’s model tool, but really, you want to do it in max/maya. I’m a fan of component unwrapping and utilize multiple textures a great deal, and to make matters worse, I pride myself in my ability to reuse unwraps for repeating and mirrored objects – having to redo all of that so there is 0 overlap is counterintuitive in my mind. As a programmer I get it – it make all kinds of sense why this is a thing when it comes to automated lighting calculations – you may want a repeating texture but you’ll never want repeating lighting. As as source guy, having the ability to even lightmap meshes in the first place is an incredible thing, point lighting of map meshes is one of source’s biggest and most glaring weaknesses. But it doesn’t make unwrapping something twice any less frustrating, and doubly so when the overlap is happening on things that are unlit/glowing anyway.
Other Musings
The only thine UE4 has crashed on me is when I’m trying to import materials attached to a mesh from max’s material editor. I’m not sure why, but the more I learn about the material system, the simpler it seems to me to just instance out a generic parent and import the textures separately anyway. Not generating shaders on import just leaves the slots open and with generic materials, and it’s a bit faster then decompressing or deleting the auto-generated ones that rarely put the correct textures in the correct maps anyway.
UE4’s texture compression and resolution pop-in is a little too obvious for my taste. Say what you want about source’s translucency, but it doesn’t dither the hell out of things to the point of text on a hologram being unreadable. And since the DXT compression and conversion to an unreal asset is automated, you loose control to disable things like mipmaps on vitally important textures you want to keep sharp. I know it’s a performance thing, but I see terrible artifacting on my holographic textures that I’d be willing to trade performance for to get rid of.
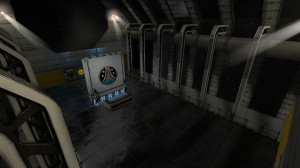
I haven’t done anything but the most baarebones mapping, but anything is better then hammer, and getting a realtime-ish lighting preview is awesome. I’ve had all kinds of mysterious ‘overlapping’ on static lighting though, I guess I’ll need to watch some tutorials or something before I turn it into a rant.
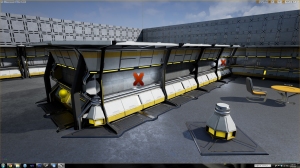
Real time reflections are awesome. A lot of the sample content takes extra care to show that off, and for good reason, they’re awesome. Did I already say that? Well it’s true.
I’m excited to see what I can do with blueprints. As someone educated in C++ but with a strong artistic background, I see it as a great intermediary. I wonder if I’m going to end up grabbing UE4’s C++ source code at some point, but right now, Blueprints offer an incredibly compelling middle ground.
Blueprints are a great example of the strengths of the engine as a whole, and the way Epic is marketing it – there is a great deal of control they’re giving to even the most basic end user, and it’s exciting as hell to think of what can be done. I feel that if I take the time to learn the tools available to me, the biggest limit to my work will be my own ability to innovate and invent. For the last 9 years of my life, I’ve focused my skill a now old and comparatively less and less user friendly engine, where half the work is figuring out why something doesn’t work and having to find a clever workaround to limitations in place due having surface access to a closed system. I feel more excited for what I can do in Unreal now then what I’ve ever thought I could do in Source. I’m pumped to learn enough to realize what I want to do, and that feeling of ‘it can be done’ is incredible and well worth every penny of the $20 a month.
It’s a shame you don’t have a donate button! I’d most certainly donate to this superb blog!
I guess for now i’ll settle for bookmarking and adding your RSS feed to my Google account.
I look forward to fresh updates and will share this site with
my Facebook group. Chat soon!
Thanks man! This is just kind of a supplemental output for me, I usually try and target it to my peers to help them with their own projects. I’m glad you find it a good read, though!